

|
|
|
#16
 11-16-2019, 09:01 PM
|
|||
|
|||
|
Havent touch one of those things in centuries but the easy way is this, no cotter extractor thingy needed :P
Just lose the small nut a few turns till is flush with the top. Grab a hammer and hit it on top of the nut, if you want to be more carefull use a piece of wood on top and then hammer the wood... samething... as the cotter moves the arm will get lose, pretty obvious after that, remove the cotter and you are good to go. Same thing with the other arm... no rocket science, if the cotters are ok re use them, if not measure them and replace them but honestly I doubt they will be bad. Remove the BB axle anyway you want because is pretty much straight forward, remove the nuts blah blah... clean everything as you do with any other bb, reinstall the thing. When you never had the tool to remove those things you have to get creative.... hammer time!... if you have a rubber mallet I would not use it because you really need to hit the cotter firmly. Good luck. ps: i know the ones that do everything by the book will say im crazy... :P 
|
|
#17
11-16-2019, 10:54 PM
|
|||
|
|||
|
That bike looks old enough to have French threads. Sometime later they switched to Swiss threads, which are the same thread size/pitch as French, but the one cup is left hand threaded like BSA.
I'm glad I don't have to work with cottered cranks any more, but these were decent cranks. If the cotter pin isn't wallered out (technical term) I prefer to reuse them.
|
|
#18
11-17-2019, 05:13 AM
|
|||
|
|||
|
If you get the bike and can't borrow a cotter press locally, I'd be happy to loan mine to you. Just pay postage to/from Chicago. Or just buy one. Handy as a paper weight when not being used for its intended purpose. ������
It's one of those tools I don't use often (just one bike in my fleet at the moment with a cottered crank), but it makes the job easy peasy.
|
|
#19
11-17-2019, 06:07 AM
|
||||
|
||||
|
Quote:
__________________
Chisholm's Custom Wheels Qui Si Parla Campagnolo
|
|
#23
11-17-2019, 12:34 PM
|
|||
|
|||
|
Quote:
|
|
#24
11-17-2019, 12:45 PM
|
|||
|
|||
|
I resolved never to own a cottered crank a long time ago. Although I think they made decent cottered cranks into the early '60s. They can be very frustrating and that was even back in the days where parts were still made.
|
|
#25
11-17-2019, 01:22 PM
|
|||
|
|||
|
To the OP, I and zzy have spoken from lengthy experience with these things.
Backing off the nut and/or using a press offer relatively little chance of not bending the precious, original, hardened cotters. The "hot hammer" is your friend! BTW, I do use a press on the majority of cottered cranks that it will fit on, having made such a press from a motorcycle chain pin tool about ten years ago. It has been quite useful, and has proven strong enough to bend an un-heated cotter with too little effort. But I now always heat the crank first. No more searching for good replacement cotters.  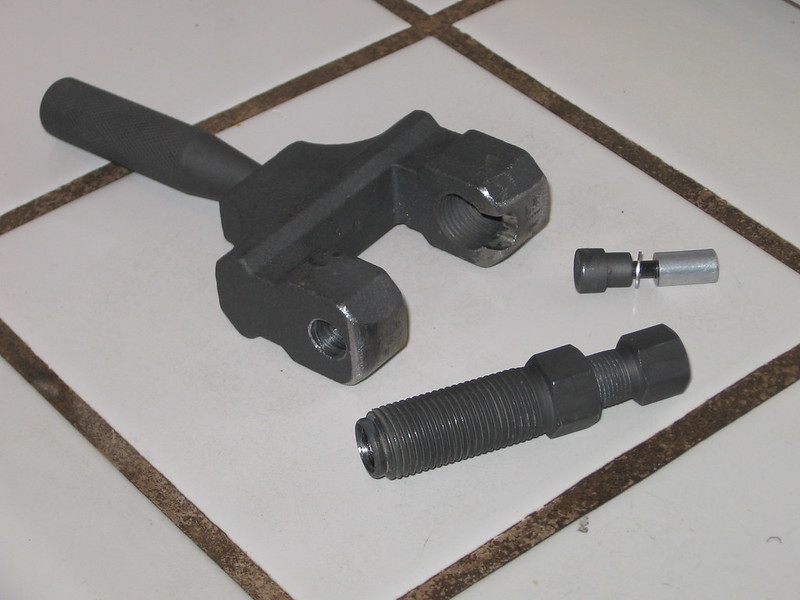 But, a hammer and thick punch can be ~equally effective at removing a well-heated crank cotter! Something like a 3/8" drive extension bar or a thick length of all-thread rod can make an excellent punch if you grind a slight divot into the end to retain center over the threaded end of the cotter. And, if you decide to leave the nut in place (good idea for the most part), remove the washer first to allow needed travel as the nut quickly contacts the crankarm. Then turn the nut so that the nut and the end of the cotter contact the drift punch (or press plunger) simultaneously. No good having all of the force going through the threads (I have seen them become stripped that way). Original Peugeot cotters tend NOT to be wallered along their flats, as they are very hard, and were very tightly installed at the factory. Upon re-installation, one must alternate between moderate hammer blows to the head of the cotter and re-applied torque on the nut. Repeat until the nut won't turn any further, and you will have replicated the sort of reliable installation achieved at the factory so many decades ago. Last edited by dddd; 11-17-2019 at 01:52 PM.
|
|
#26
11-17-2019, 03:12 PM
|
|||
|
|||
|
".....and re-applied torque on the nut. "
This works but you have a problem tho, the threads of the cotter pin can go bye bye aswell, IME is not just go and tight that thing till doesnt move no more. IMO is more like how good is the guy at using the tools and how good is at to sense when something is ok and know when to stop.
|
|
#27
11-17-2019, 03:20 PM
|
|||
|
|||
|
Quote:
It's not about being good at using tools, it's about understanding what you're doing. Torquing the nut is used to check insertion, and at the end, to just have it be secured on there. The nut is not used to pull the cotter pin farther in, so it should never be getting brought anywhere into the remote vicinity of its torque limits. Even a ham-fisted mechanic shouldn't be at risk of damaging anything, unless they don't understand what the task they're doing is. Last edited by HTupolev; 11-17-2019 at 03:25 PM.
|
|
#28
11-17-2019, 03:36 PM
|
|||
|
|||
|
I do get that... but how do you think I learn to use my tools?.... correct!.... I blew and good ammount of those cotters when i was a kid fixing my caloi 20 inches bike when I was a kid
 Like this one but in red... btw no idea who that guy is :P  Got one of those made in chile bianchis aswell after I destroyed the caloi 
|
|
#29
11-18-2019, 03:08 PM
|
|||
|
|||
|
The blue one looks like a cleverly versatile machine with the step thru and built-on rack of sorts. But trying to imagine what you used it for, as if you had perhaps taken those aggro fork gaiters seriously, lol.
At about your age, I was fortunate enough to have put together a sturdy Schwinn that covered all bases where the roads ended: 
Last edited by dddd; 11-18-2019 at 03:12 PM.
|
 |
|
|


 Linear Mode

