

|
|
|
#46
 05-17-2017, 03:44 PM
|
|||
|
|||
|
Quote:

|
|
#47
06-07-2017, 04:34 PM
|
|||
|
|||
|
Copied Weaponsgrade
Just thought I'd give Weaponsgrade a shout out for the storage solution -- thank you. I elected to use the 4 wheel trolleys made by Unistrut (P2750-EG). Installation photo attached.
Best, Taylor SF CA
|
|
#48
07-24-2017, 02:49 PM
|
||||
|
||||
|
OK, circling back on this project. I FINALLY found the time to knock this out after a false start with some 'lesser" shelf brackets left me less than confident in having a dozen or so bikes hanging above our cars in the garage. I found some heavy duty brackets that were rated for 1200 lbs and bolted conduit hangers to them to hold the conduit.
The project came in just under $175 (a bit more expensive than anticipated), but I'm very pleased with the outcome. It allows a lot of flexibility to move the bikes around as necessary and puts them all along a single wall which was the goal. Now onto the rest of the garage - floors, paint, lighting, etc... I'd be happy to post a list of the parts for the rack and the steps involved if anyone is interested for future reference. Texbike
|
|
#51
07-25-2017, 02:55 PM
|
|||
|
|||
|
That looks incredible. Very pro, almost like one of the service vans that are lined with rows of wheels. Congrats and thanks for the step by step rundown.
|
|
#52
07-25-2017, 04:14 PM
|
||||
|
||||
|
OK, per the request of a couple of people, here's a list of the components and how it was put together. The goal was to build a bike rack that would hold as many bikes as possible along a single, 16 foot section of our garage using bike hooks that would slide along the length of the wall in order to more efficiently store the bikes.
Parts used to build the overhead, sliding base: (5) Everbilt 12X8 Heavy duty shelf brackets (rated at 1200 lbs per pair) (5) #2 EMT/electrical conduit hangers for 1" EMT (5) 1/4 X 3/4" bolts to bolt conduit hangers to shelf brackets (20) 1/4" washers (4 per bolt that attaches the conduit hangers to the shelf brackets - 2 on top of bracket/2 under head of the bolt with the bolt inserted from underneath) (5) 1/4" nuts to attach the conduit hangers to the shelf brackets (1 per assembly) (10) 1/4 X 2.5" lag bolts (2 per shelf) to attach the shelf brackets to the studs 1" EMT Conduit (only sold in 10' lengths locally - (I had to buy two and cut one of them down to fit) 1" EMT female/female coupling Parts used to build the sliding bike hooks: Park Tools THREADED bike hooks #4 (you could also get away with using a #3) Conduit hanger (4) 1/4" washers Steps to put it all together: Assemble the overhead sliding base by attaching a #2 Conduit hanger to the last hole on the horizontal arm of each of the shelf brackets. I attached them by putting two washers over the bolt, pushing it up through the hole in the conduit hanger, through the hole in the shelf bracket, adding two washers and a 1/4 nut on top. Locate the studs in the wall, determine where you want to place your shelf brackets, and identify the position of the top screw for each bracket and ensure that they're aligned (I used a laser marker). Once the position of the top hole for each shelf bracket is determined, drill a small pilot hole, position the shelf bracket, and screw the self-drilling screw through the bracket (with a washer between the screw and bracket) and into the stud. Do this for each of the brackets. Once the brackets have all been installed with their 1st top screw, test fit the 1" EMT through the conduit hangers, measure, remove, and cut to size. In my case, I joined the two lengths of of EMT together with the coupler 1st and then did a test fit, measure, and cut (I wanted to have the coupler as close to one of the shelf brackets/conduit hangers as possible for support. Once cut to fit, slide the EMT back into the conduit hangers and bolt them down tight. Use the EMT to align the brackets, drill pilot holes for the bottom screws, and screw in the bottom anchor screws. Assemble the bike hook assemblies by sliding the threaded part of the bike hook through the #4 conduit hanger (I put a nut and two washers on EACH side of the conduit hanger for reinforcement. Tighten everything down. Unbolt the top bolt of the #4 conduit hangers, slide them over the 1" EMT cross bar, and tighten the bolts back up. Voila! Test fit bikes to the hooks and move them back and forth along the conduit to position them as efficiently as possible. I staggered the bikes (thanks for the suggestion Charles) to make it easier and was able to hang 15 bikes/frames along the 16 foot wall with room for additional wheels, etc. As mentioned previously, I initially started with a set of less heavy-duty shelf brackets that had the rod holder incorporated into the design. However, I didn't like how soft the metal was and how easily the bracket arms would bend . It just didn't seem solid enough to be hanging 350-400 lbs worth of bikes above a motorcycle and an old 911. Plus I wanted to move the conduit closer to the wall so that the bikes were a bit closer. The heavy duty brackets mentioned above (rated at 1200 lbs per pair) with the conduit hangers seemed to be the answer to those concerns. It also allowed the use of a larger diameter lag bolt for a bit more security. I've attached a couple pics of what the shelf bracket and sliding bike hook assemblies look like for reference. I assume you don't need a picture of the conduit.  My biggest regret is not sitting down and figuring this out before selling off my two MX Leaders to make room in the garage.  I hope this helps! Texbike Last edited by texbike; 07-25-2017 at 06:12 PM. Reason: add pics
|
|
#54
07-26-2017, 12:23 AM
|
|||
|
|||
|
Quote:
|
|
#56
03-22-2018, 10:17 PM
|
||||
|
||||
|
Shoutout to Texbike for design and Steve in SLO for IPA and mismeasurement skills. This rack was easy to make and kickass. Remember, measure once and cut twice. I think.
Last edited by GuyGadois; 03-22-2018 at 10:24 PM.
|
|
#58
03-23-2018, 10:25 AM
|
|||
|
|||
|
My first visit to this thread, it was a topic of great interest about six years back.
I can recommend "neoprene" reinforced fuel hose as a durable covering for metal hooks, it slides on easily with a few drops of rubbing alcohol. Bending the 1' lengths of 3/16" steel rod into usable 90-degree S-hooks was a challenge, so while the local iron works was working on my prototype hook, I came up with this tool (made from inexpensive materials sourced at Home Depot): 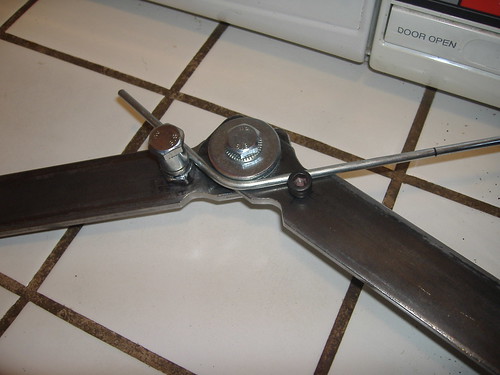 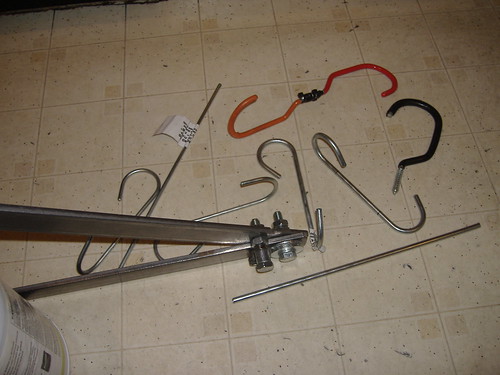 Six-packs of S-hooks f(rom the 1-Dollar store!) and made from 5/32" (4mm) steel rod are also sturdy enough for any road bike, but opening up the bend radius to accommodate a very wide rim will result in a loss of resistance to bending (probably only a concern with the heaviest off-road or touring bikes though). Here is a re-bent one (shown between two hooks made at home from the thicker 3/16" rod): 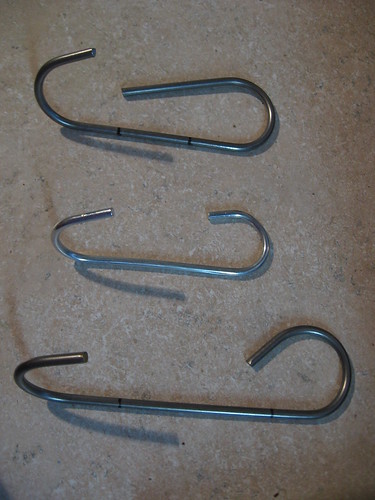 I chose to slide the hooks along a length of iron pipe (1.1" OD) and hung from steel hooks that thread into ceiling joists spaced 32" apart (every other joist). The hooks snap onto the iron pipe precisely and I got the hooks at True Value Hardware for about $1.50 each. Each is rated for 110lbs, but I hung my own weight from the pipe, directly under one hook, and jolted to test it (I weighed 155#). Described as "Ceiling Hook, #0 X 4-15/16" (measured as 0.3" diameter steel). 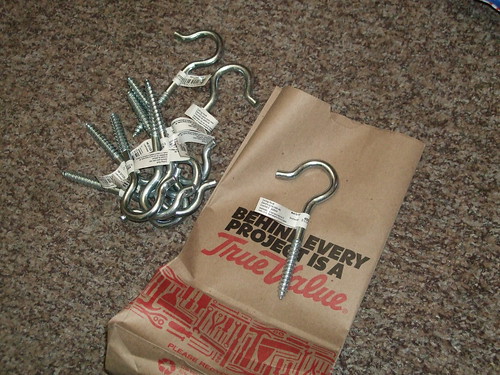 22 road bikes fit along the 17-foot length of pipe with just enough wiggle room for ingress/egress. The hooks can be slid along the pipe easily enough, though there is sliding stiction when the bike's weight is on it. Not a big deal really, I just wiggle it along and it moves. Note that my particular project aimed for absolute lowest cost, though the iron pipe (cut to exact length at Sierra Pipe) could be considered an upgrade over basic conduit (though still very inexpensive). If a hook ever broke, this iron pipe would not buckle. 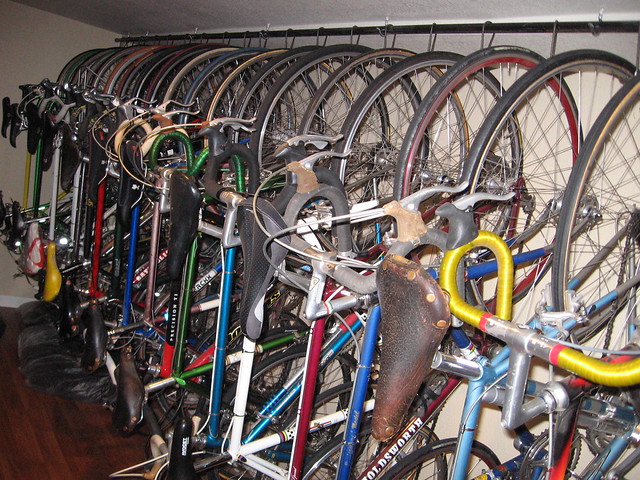 I had already built a stand-alone version using much thicker pipe, out in the garage, and it has since been retired. But it supported 14 very heavy bikes as an experiment (including a vigorous bounce test) without fail: 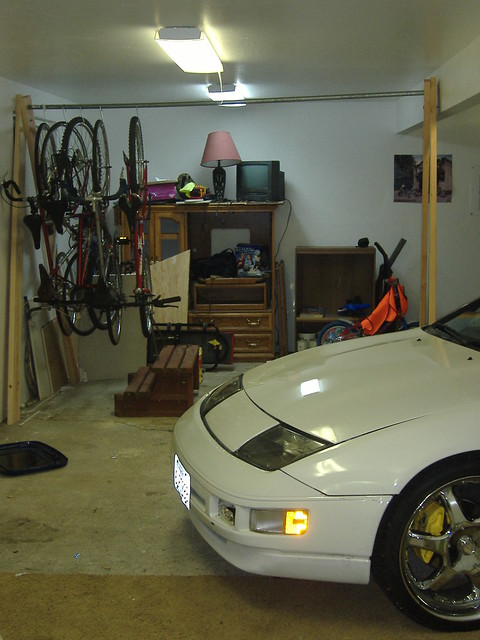 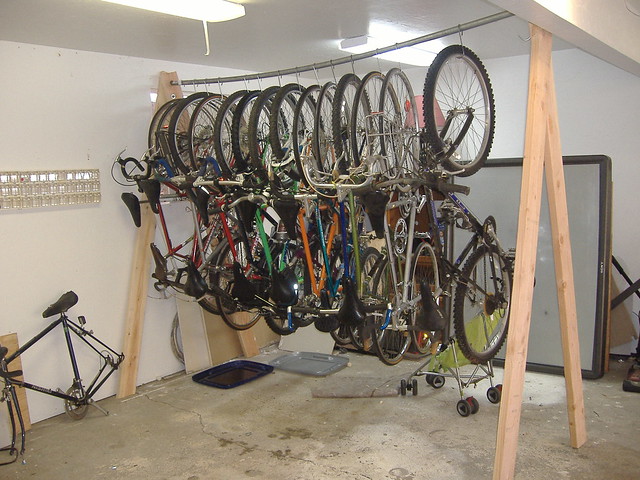 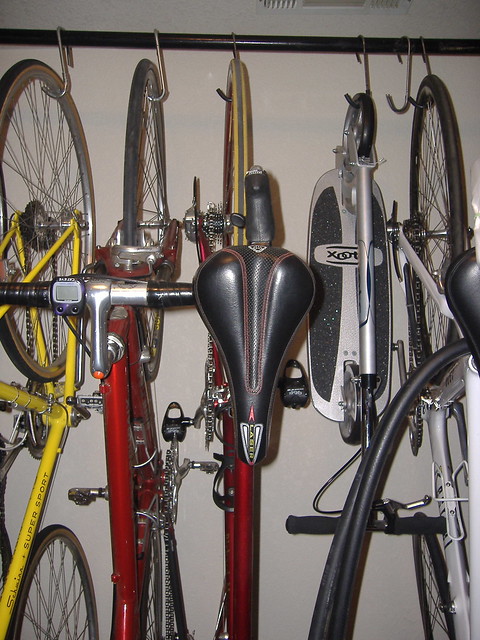
Last edited by dddd; 03-23-2018 at 10:55 AM.
|
|
#59
03-23-2018, 11:17 AM
|
|||
|
|||
|
Thanks for this. Am currently considering moving from current home with a 3 car garage to one with a 2 car. Want to garage 2 cars and 6 bikes. Plus some other shelving. Wanting to totally organize the garage....work bench, tool chest, etc. Thinking about using Lowes or a HD contractor. or a local closet and garage space expert.
|
|
#60
03-23-2018, 11:29 AM
|
||||
|
||||
|
I need to do this...but...
If my foray into designing/building a kayak hoist for the garage is any indication, I'll spend about $1100 on a rack system for 8 bikes.
 The kayak hoist is pretty sturdy, leveraging (ahem) a five pulley system. I'm pretty sure I could hoist the kayak to the ceiling while I'm sitting in it!
|
 |
| Tags |
| bike storage |
| Thread Tools | |
| Display Modes | |
|
|


 🏻*
🏻*


 Linear Mode

