

|
|
|
#1
 03-10-2023, 05:11 PM
|
||||
|
||||
|
Where to get a Shimano freehub body tool
Took off the freehub from this wheel I'm working on and I wouldn't mind repacking the freehub bearings. I think it's loose bearings and I'll need the tool to remove this 2-notch race/ cone part.
Anyone know where to get a good tool to disassemble this? 
|
|
#2
03-10-2023, 05:32 PM
|
|||
|
|||
|
could be mistaken but think it takes...
a big fat hex key. No?
https://www.google.com/search?tbm=vi...id:qf0c_tixHF4 Often a cheater cuz they're on tight.
__________________
Crust Malocchio, Turbo Creo Last edited by eddief; 03-10-2023 at 05:35 PM.
|
|
#3
03-10-2023, 06:39 PM
|
|||
|
|||
|
They are available on eBay and Amazon. Google search "Shimano freehub disassembly tool".
There's a youtube video where a home mechanic explains how he made a tool. Park Tool doesn't recommend disassembly. Here's why.
__________________
http://hubbardpark.blogspot.com/
|
|
#4
03-10-2023, 06:46 PM
|
|||
|
|||
|
Quote:
|
|
#5
03-10-2023, 06:55 PM
|
|||
|
|||
|
I do not fully rebuild Shimano freehub bodies, but I do sometimes flush them out or even lube them externally from next to the hub flange on lower-tier units that have no rubber seal there. This quiets them down and can free up dried lube and/or crud inside.
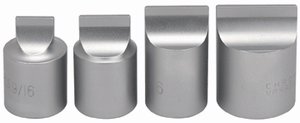
Higher-end (sealed) models can be lubricated from behind the drive side gap behind the sealing shield, assuming that is that the hub hasn't ever been serviced using so much grease as to obstruct the annular space around the cup. The axle must first be removed to do this however. I hate replacing the entire body, especially having to source the exact replacement (there are too many subtle variations for me to want to make any substitutions in most cases). When a freehub body develops bearing looseness/free-play, I use a home-made tool to remove the outer "locking cone/cup", then I sand down the seating surface that controls how tight the bearing tension will be. There is no going back if you sand off too much metal from the "snout" of that locking cone/cup with the notches in it! The spacing shims are basically not available, and although I have harvested some used spares, I don't much like having to do any shim-swapping. The tool needed can be made simply using a 13/16" socket having a maximal OD to engage two notches in the locking cone/cup. I made mine using a bench grinder, then dressed to some level of precision using a sharp flat file. Cutting four lugs into the socket would be complicated by the need for perfect 90-degree indexing, so was not considered. It "looks" good, well, because I did it by "eye"! It has proven strong enough since I assure deep engagement of the two lugs while applying torque with it. I always use the grease-compatible grade of Loctite on the cone threads when I re-torque the cone to a "guttentight" level of tightness. Don't forget to add liquid grease or other good lube while the cone is removed(!), and watch out for any balls that might stick to the cone and go flying. Do not poke at or disturb the balls in that top race, one might fall deep inside of the ratchet area since there is a lot of rocking motion possible when the cone isn't secure! Do also check the tightness of the hollow retaining bolt whenever the axle has been removed! **Editing here to parrot oldpotatoe's mention of the cup/cone always having left-hand threads. Good news is that this tool also fits lower-tier Fulcrum and other freehubs, saving considerable coin over buying a new freehub body each time I use it. Lastly, use of a long breaker bar with hinge allows one to keep the force on the handle in-plane with the tool's engagement lugs, preventing the tendency of the tool to perhaps rock sideways. I use a 1/2" breaker bar in all cases. 
Last edited by dddd; 03-12-2023 at 03:59 AM.
|
|
#8
03-11-2023, 06:20 AM
|
||||
|
||||
|
Quote:
__________________
Chisholm's Custom Wheels Qui Si Parla Campagnolo
|
|
#9
03-11-2023, 07:25 AM
|
||||
|
||||
|
I do see a few tool on Amazon for about $20 which is cheaper than I could possibly make it myself. But I am wary of quality of Amazon products.
And RJ shows an overhaul and it didn't look too bad. Just have to be careful with the loose bearings. https://www.youtube.com/watch?v=X9gIEG1db0s https://www.youtube.com/watch?v=f19BGYc5ysA https://www.youtube.com/watch?v=1qBk5pePGRg
|
|
#10
03-11-2023, 07:43 PM
|
|||
|
|||
|
I might still have one of those tools left. I sold the accompanying tool to remove that freehub ring, but I think I have one left.
__________________
Forgive me for posting dumb stuff. Chris Little Rock, AR Last edited by bikinchris; 03-12-2023 at 08:07 PM.
|
|
#11
03-12-2023, 03:52 AM
|
|||
|
|||
|
Quote:
Some of the freehub bodies require larger than a 10mm key to remove or tighten, I've even used a sharp-cornered 3/8" square drive extension directly on some of them! And oldpotatoe makes a crucial point to remember, that all of these cup/cone parts are left-hand threaded.
|
|
#12
03-12-2023, 08:13 PM
|
|||
|
|||
|
I didn't see that tool just now. I'll look again in the daylight.
__________________
Forgive me for posting dumb stuff. Chris Little Rock, AR
|
 |
| Thread Tools | |
| Display Modes | |
|
|


 Linear Mode

