

|
|
|
#1
 05-30-2020, 12:47 PM
|
|||
|
|||
|
OT: PVC drain pipe failure above ceiling
I generally don't post OT's, but plumbing is not my specialty and I am perplexed by the complete failure of a ~25-y-o 1.5" PVC bathroom drain pipe that runs overhead above a downstairs hallway.
Was sitting here at my computer just yesterday, post-ride lunch and catch-up on my Email and forums. Suddenly I started hearing the "tink tink" of water drops landing on some nice alloy rims. I immediately headed downstairs to see a 1 foot diameter bubble of latex paint hanging down from the ceiling surface. I ran outside, shut off the water, grabbed a bucket and got the bucket under the huge, dripping paint bubble. I poked the bubble with a screwdriver and almost a quart of water rushed out. The dripping ceased completely within minutes. So I cut out a square of sheet rock to the centerline of the nearest stud, looked up and saw the black sch40 1-1/2" pipe with a slightly irregular crack nearly clean through it. There was evidence of this leak having been seeping for quite a while, rusted drywall screws and moldy delamination under the cardboard facing. I ran a saw though the jagged crack line and fitted up a rubber coupler for a convenient fix to the plumbing. My questions are what caused this failure, and if the rubber coupler is sufficient to hold up to long-term use including chlorinated cleaning and drain-clearing products? And I'm thinking that perhaps some design rule may have been overlooked having to do with accommodating length-wise thermal expansion. Hoping that the rubber might help here(?). 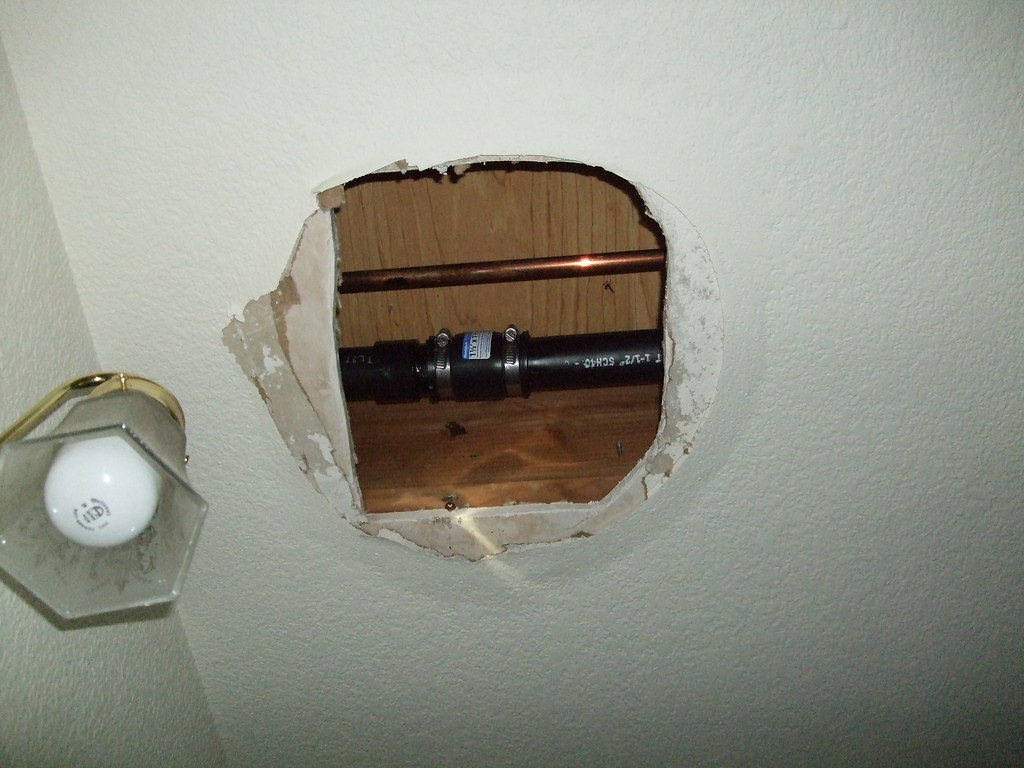
Last edited by dddd; 05-30-2020 at 01:00 PM. 
|
|
#2
05-30-2020, 12:58 PM
|
|||
|
|||
|
Can't imagine why a PVC pipe would crack. Furnco fittings are quite durable as long as you support any pipe load so there isn't any shear at the splice and there isn't a huge gap between the two pipe sections. If no problems there and hose clamps are tight you should be good.
|
|
#3
05-30-2020, 01:02 PM
|
|||
|
|||
|
Not sure what caused the failure, maybe not supported properly in the area of the failure. Also, excessive glue around a joint can also weaken the pipe and cause failure.
I've seen these rubber couplers last over 25 years and not leak. If there was little space between the two pipes after cutting and joining the two with the rubber coupler there should not be a problem of sewage moving freely. If this was under the house I would not worry. Because its in the ceiling I would replace it properly by cutting out the bad and re-gluing another piece of pipe to this system.
|
|
#4
05-30-2020, 01:11 PM
|
|||
|
|||
|
Quote:
Perhaps I didn't fully appreciate the need for a smooth inner surface and there was/is a missing chunk leaving a 9/16" gap about one third of the way around and to the bottom. He recommended using two shorty rubber couplers with a short length of new pipe between them, ostensibly to facilitate installation and to leave a smooth inner wall. Oh, and I really lucked out here in that my very last use of the bathroom had been for taking a shower! Do you think that the ends of the pipe should have some amount of give in the lengthwise direction to-and-fro, to accommodate thermal expansion? Would solid glued-up attachment sufficiently accommodate expansion if the ends now feel rigidly fixed (without my coupler) where the break is? I don't know how I would assemble a glued pair of couplings unless I removed the inside mating/centering ridge from at least one of them (since the ends won't flex in the lengthwise direction). Last edited by dddd; 05-30-2020 at 01:30 PM.
|
|
#5
05-30-2020, 01:12 PM
|
|||
|
|||
|
The Fernco fitting is fine for long term use, however, you need support under each side of the new splice to keep the shear load off of the rubber. Just nailing a couple of boards between the joists would do it.
|
|
#6
05-30-2020, 01:17 PM
|
|||
|
|||
|
Some standing water froze?
|
|
#7
05-30-2020, 01:34 PM
|
|||
|
|||
|
Quote:
__________________
This foot tastes terrible! 
|
|
#8
05-30-2020, 02:03 PM
|
||||
|
||||
|
I'm seeing black pipe, so ABS, not PVC. Talk to two plumbers, get three opinions, but our master plumber does not like ABS because it is more prone to damage--I would lean towards damage before install.
Fernco is fine and will meet code because it will be covered up.
|
|
#9
05-30-2020, 02:07 PM
|
|||
|
|||
|
If this were my place, I'd get a short piece of the same 1-1/2" pipe (BTW - you mention the last use was a shower - showers are usually plumbed with 2". And if you meant, not a toilet flush, that pipe is way too small, would need to be 3") and a coupling. Slide the Fernco onto one pipe past the joint, glue in the new piece with the coupling so that there is essentially no gap between the old cut piece and the new piece, then slide the Fernco back over the (no) gap and tighten.
If you want to be extra cautious, make up the new piece with a clean-out in it. Finally - not a plumber, but in my experience in New England I have never seen black PVC - all black DWV piping is ABS. They are NOT compatible in terms of the glue used. If I can help further PM me.
|
|
#10
05-30-2020, 03:10 PM
|
|||
|
|||
|
Thanks all, I now realize I was very likely incorrect about how the bathroom is really plumbed.
Now I'm thinking that this pipe must be just for one or both of the bathroom sinks, and that the toilet and tub drain likely straight down the wall of the laundry room directly below. That would be great, because presumably now I don't have to worry about the inside of the joint being perfectly smooth(?). There was that chip off one of the pipe ends after I ran the saw through the crack. And robt57 you are probably right about the pipe having got dinged/cracked somewhere along it's journey to it's present location! I should have mentioned that it actually doesn't get that cold here and that this pipe is central within the house. I suppose I could slide the coupling away and test-flow which bathroom appliances actually empty into this pipe. Or, wait, I'll just run hot water to do that! And I will wrap the OD of the coupling with beer can sheet (two layers of a thicker-wall larger beer can) and secure that with a pair of clamps to better preserve the alignment of the two ends. This is the kind of feedback that I hoped would come from this great forum.
|
|
#11
05-30-2020, 03:48 PM
|
|||
|
|||
|
Quote:
Quote:
Quote:
For long-term peace-of-mind repair I would recommend: 2 clean cuts removing some additional minimum length of "OK" pipe on either side of the crack, to be safe + a bridge piece of new 1 1/2" SCH40 ABS (Edit: I see NHAero suggests this as well, above) + 2 new Fernco clamps + 2 galvanized "U" hangers holding the (extant, not the new middle repair piece) pipe to the plywood substrate above, but still allowing lateral movement of the pipe. Last edited by Dino Suegiù; 05-30-2020 at 03:51 PM.
|
|
#12
05-30-2020, 05:14 PM
|
||||
|
||||
|
Quote:
|
|
#13
05-30-2020, 06:15 PM
|
|||
|
|||
|
Quote:
The two sinks are on separate drain lines, at least at that level of the house. The pipe that broke turns out to serve just the one sink, so it was just a coincidence that it failed completely some minutes after I took my post-ride shower.
|
|
#14
05-30-2020, 06:46 PM
|
|||
|
|||
|
I was putting in a horizontal support under the pipe when I discovered that there is a second, identical crack around this pipe just a few inches from my repair!
It's like this pipe has some material defect to it, super brittle or something. Again, the crack is perfectly around the pipe. I had flexed the pipe slightly and noticed a line of water droplets suddenly appear along a circumferential line. Thinking that perhaps I won't even need a saw this time.
|
|
#15
05-30-2020, 08:10 PM
|
|||
|
|||
|
No, combined. But toilet drain is min. three inch.
In some buildings where gray water is used for irrigation they are kept separate from black water Quote:
|
 |
|
|


 Linear Mode

