Know the rules The Paceline Forum Builder's Spotlight


Go Back   The Paceline Forum > General Discussion

Reply
 
Thread Tools Display Modes
  #1  
Old 07-11-2017, 08:21 AM
ontarget ontarget is offline
Senior Member
 
Join Date: Apr 2015
Location: Pasadena, CA
Posts: 224
Installing front derailleur cable through BB

My front derailleur cable is beginning to fray, so I need to replace it. I've never done this on this particular bike before, and have a question for you all before I screw something up.

The cables are externally routed. The FD cable runs on the bottom side of the downtube, through a guide on the bottom side of the BB, through a hole in the bottom side of the BB area, then out a hole in the top side and to the derailleur. The portion going through the BB area looks like a straight shot. Should I expect to be able to just insert the new cable without much fuss, or do I need to attach a string to the old cable to use for pulling the new cable through? Or some other technique?

Thanks!

Sent from my XT1585 using Tapatalk
Reply With Quote
  #2  
Old 07-11-2017, 08:22 AM
AngryScientist's Avatar
AngryScientist AngryScientist is offline
Administrator
 
Join Date: Mar 2010
Location: northeast NJ
Posts: 33,178
what bicycle are we talking about here?

a picture of the BB area would totally help...
Reply With Quote
  #3  
Old 07-11-2017, 08:33 AM
Blown Reek Blown Reek is offline
Senior Member
 
Join Date: May 2015
Posts: 1,675
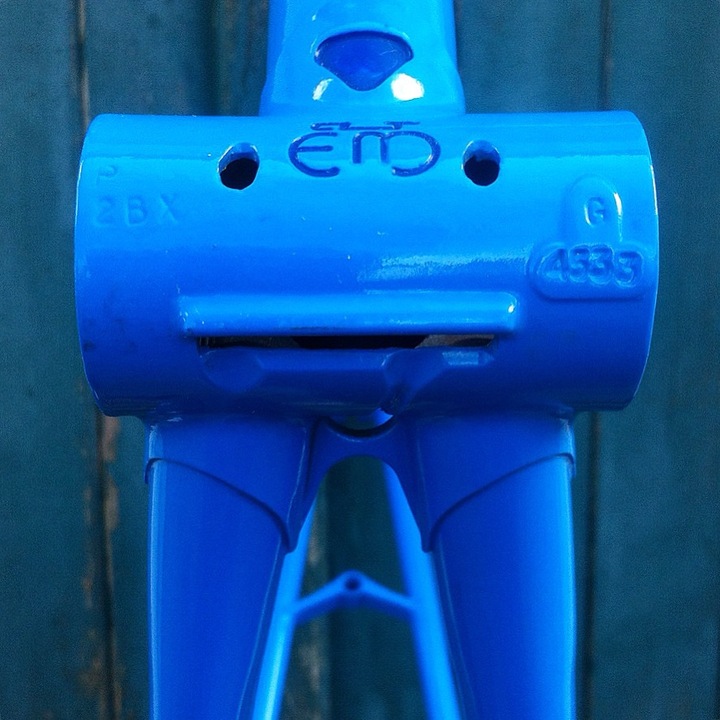
If it's external and your bottom bracket guide looks like this,


then all you have to do is route the cable. No other tools or tricks necessary. Easiest thing to do in the world.
Reply With Quote
  #4  
Old 07-11-2017, 08:56 AM
eddief eddief is offline
Senior Member
 
Join Date: Dec 2003
Location: Santa Rosa, CA
Posts: 11,861
on the other hand

I had a Spec Roubaix where the channel through the bb was a bit clogged up. I think there was a plastic tube through which the cable had to pass. It took a bit of "jamming" of the cable to clear the path. But I'd guess if when you take out the old one and if it comes out smoothly, then inserting the new one should go smoothly too.
__________________
Crust Malocchio, Turbo Creo
Reply With Quote
  #5  
Old 07-11-2017, 08:57 AM
seanile's Avatar
seanile seanile is offline
Senior Member
 
Join Date: Jan 2014
Location: London
Posts: 1,768
could look like this, in which case you want the little plastic tubies

Last edited by seanile; 07-11-2017 at 08:59 AM.
Reply With Quote
  #6  
Old 07-11-2017, 09:04 AM
ColonelJLloyd ColonelJLloyd is offline
Senior Member
 
Join Date: Dec 2012
Location: Louisville
Posts: 5,834
If it's like the Merckx you can rob the lining from sold old housing by dissecting carefully with a razor blade.
Reply With Quote
  #7  
Old 07-11-2017, 09:06 AM
zmudshark's Avatar
zmudshark zmudshark is offline
Small ring
 
Join Date: Oct 2007
Location: AZ in Winter A2 in Summer
Posts: 5,827
If it's a straight shot, it's a straight shot. Should be easy-peasy.
Reply With Quote
  #8  
Old 07-11-2017, 09:35 AM
ontarget ontarget is offline
Senior Member
 
Join Date: Apr 2015
Location: Pasadena, CA
Posts: 224
Sorry for the lack of photos previously. Here are a couple quick ones I took as I was heading off to work this morning.

Sent from my XT1585 using Tapatalk
Reply With Quote
  #9  
Old 07-11-2017, 10:09 AM
icepick_trotsky's Avatar
icepick_trotsky icepick_trotsky is offline
Senior Member
 
Join Date: Jun 2015
Location: Saint Louis
Posts: 1,541
I think you just poke that through as is and cross your fingers.
__________________
Party on Comrads! -- Lenin, probably
Reply With Quote
  #10  
Old 07-11-2017, 10:17 AM
David Kirk's Avatar
David Kirk David Kirk is offline
Senior Member
 
Join Date: Dec 2003
Location: Bozeman MT
Posts: 8,406
Start with a brand new uncut cable so that it's soldered closed on the end and this will allow you to poke and jab it through without worry of it fraying. Then once you get it all set up cut it to length.

dave
Reply With Quote
  #11  
Old 07-11-2017, 10:56 AM
Blown Reek Blown Reek is offline
Senior Member
 
Join Date: May 2015
Posts: 1,675
Quote:
Originally Posted by icepick_trotsky View Post
I think you just poke that through as is and cross your fingers.
Quote:
Originally Posted by David Kirk View Post
Start with a brand new uncut cable so that it's soldered closed on the end and this will allow you to poke and jab it through without worry of it fraying. Then once you get it all set up cut it to length.
Yes and yes. Poke gently.
Reply With Quote
  #12  
Old 07-11-2017, 03:38 PM
ontarget ontarget is offline
Senior Member
 
Join Date: Apr 2015
Location: Pasadena, CA
Posts: 224
Thanks for the feedback, everyone. Much appreciated!

Sent from my XT1585 using Tapatalk
Reply With Quote
  #13  
Old 07-11-2017, 03:42 PM
dustyrider dustyrider is offline
Senior Member
 
Join Date: Mar 2012
Posts: 2,999
Reply With Quote
  #14  
Old 07-11-2017, 03:50 PM
Mark McM Mark McM is offline
Senior Member
 
Join Date: Jun 2006
Posts: 12,053
That's an awfully sharp bend where the cable enters the BB shell - not a particularly well executed design. While I'm sure it can work at some level, the derailleur cable can easily get a kink at the bend, hampering the shifting performance a bit. Not to mention that if you shift the front derailleur a lot, the cable may slowly saw its way through the BB shell.

What brand/model bicycle is this?
Reply With Quote
  #15  
Old 07-11-2017, 03:56 PM
Hilltopperny's Avatar
Hilltopperny Hilltopperny is offline
Senior Member
 
Join Date: Nov 2015
Location: Lassellsville NY
Posts: 9,940
I took a pipe cleaner and threaded the cable through it and through the frame on my internally routed bike. Before I figured that out it seemed impossible.
Reply With Quote
Reply


Posting Rules
You may not post new threads
You may not post replies
You may not post attachments
You may not edit your posts

BB code is On
Smilies are On
[IMG] code is On
HTML code is Off

Forum Jump


All times are GMT -5. The time now is 12:55 PM.


Powered by vBulletin® Version 3.8.7
Copyright ©2000 - 2024, vBulletin Solutions, Inc.